最近要弄在 framework 中弄一个统计应用使用时长的功能。刚开始想着要怎么是不是要在 ActivityManagerService(AMS)的几个 Activity 的生命周期那埋几个统计点,后面发现 android 自带了一个 UsageStatsService(USS)的系统服务。这个东西统计的数据已经满足这边的需求了。只不过 android 好像只是统计了数据,并没怎么用(不过不排除 google 服务偷偷的用这个东西,google 服务应用是不开源的),所以还需要改造一下下。不过基本已经算是没啥难度了,不需要验证自己埋点是不是正确的(android 自己的服务准确性上还是值得信赖的)。这里把这个服务和之后自己的改造稍微分析一下,照例先把相关源码的位置啰嗦一下(4.2.2):
1
2
3
4
5
6
7
8
9
10
11
12
13
14
15
16
17
frameworks/base/services/java/com/android/server/am/UsageStatsService.java
frameworks/base/services/java/com/android/server/am/ActivityManagerService.java
frameworks/base/services/java/com/android/server/am/ActivityStack.java
frameworks/base/services/java/com/android/server/am/ActivityRecord.java
frameworks/base/services/java/com/android/server/wm/WindowManagerService.java
frameworks/base/services/java/com/android/server/wm/AppWindowToken.java
frameworks/base/core/java/android/os/Parcel.java
frameworks/base/jni/android_os_Parcel.cpp
frameworks/native/libs/binder/Parcel.cpp
frameworks/native/include/utils/Unicode.h
UsageStatsService
初步认识
USS 虽然说是一个单独系统服务,但是从代码位置来看隶属于 AMS 家族:代码位于 frameworks/base/services/java/com/android/server/am 下面(在 services 包下能单独开一个文件夹的 SS 都是十分庞大的,例如:AM、WM、PM 之类)。它是由 AM 来启动的:
1
2
3
4
5
6
7
8
9
10
11
12
13
14
15
16
17
18
19
20
21
22
23
24
25
26
27
28
29
30
31
32
33
34
35
36
37
38
39
40
41
42
43
44
45
46
47
48
49
50
51
52
53
54
55
56
57
58
59
60
61
62
63
64
65
66
67
68
69
70
71
72
73
74
75
76
77
78
79
80
81
82
83
84
85
86
87
88
89
90
91
92
93
94
95
96
97
98
99
100
101
public final class ActivityManagerService extends ActivityManagerNative
implements Watchdog .Monitor , BatteryStatsImpl .BatteryCallback {
... ...
final UsageStatsService mUsageStatsService;
... ...
private ActivityManagerService () {
... ...
File dataDir = Environment.getDataDirectory();
File systemDir = new File(dataDir, "system" );
systemDir.mkdirs();
mBatteryStatsService = new BatteryStatsService(new File(
systemDir, "batterystats.bin" ).toString());
mBatteryStatsService.getActiveStatistics().readLocked();
mBatteryStatsService.getActiveStatistics().writeAsyncLocked();
mOnBattery = DEBUG_POWER ? true
: mBatteryStatsService.getActiveStatistics().getIsOnBattery();
mBatteryStatsService.getActiveStatistics().setCallback(this );
mUsageStatsService = new UsageStatsService(new File(
systemDir, "usagestats" ).toString());
mHeadless = "1" .equals(SystemProperties.get("ro.config.headless" , "0" ));
... ...
}
... ...
public static final Context main (int factoryTest) {
AThread thr = new AThread();
thr.start();
synchronized (thr) {
while (thr.mService == null ) {
try {
thr.wait();
} catch (InterruptedException e) {
}
}
}
ActivityManagerService m = thr.mService;
mSelf = m;
ActivityThread at = ActivityThread.systemMain();
mSystemThread = at;
Context context = at.getSystemContext();
context.setTheme(android.R.style.Theme_Holo);
m.mContext = context;
m.mFactoryTest = factoryTest;
m.mMainStack = new ActivityStack(m, context, true );
m.mBatteryStatsService.publish(context);
m.mUsageStatsService.publish(context);
synchronized (thr) {
thr.mReady = true ;
thr.notifyAll();
}
m.startRunning(null , null , null , null );
return context;
}
... ...
}
public final class UsageStatsService extends IUsageStats .Stub
... ...
public void publish (Context context) {
mContext = context;
ServiceManager.addService(SERVICE_NAME, asBinder());
}
... ...
}
这里如果有个我写的 Binder 系列那些知识的话是很简单的,SS 启动 AMS,然后 AMS 创建 USS,再调用 USS 的 publish 向 SM 注册 USS,这样 framework 中的各个模块(原生的 USS 不对第三方应用开放接口的)就能通过 SM 调用 USS 提供的 IPC 接口了。那我们也清楚了 USS 是在 AMS 初始化的时候启动的。
数据结构
我们初步认识了 USS 之后,来看下 USS 使用的数据结构。在 USS 中有2个内部类(代码不多一次贴全了):
1
2
3
4
5
6
7
8
9
10
11
12
13
14
15
16
17
18
19
20
21
22
23
24
25
26
27
28
29
30
31
32
33
34
35
36
37
38
39
40
41
42
43
44
45
46
47
48
49
50
51
52
53
54
55
56
57
58
59
60
61
62
63
64
65
66
67
68
69
70
71
72
73
74
75
76
77
78
79
80
81
82
83
84
85
86
87
88
89
90
91
92
93
94
95
96
97
98
99
100
101
102
103
104
105
106
107
108
109
110
111
112
113
114
115
116
117
118
119
120
121
122
123
124
125
126
127
128
129
130
131
132
133
134
135
136
137
138
139
140
141
142
143
144
145
146
147
148
149
150
151
152
153
154
155
156
157
158
159
160
161
162
163
164
165
166
167
168
169
170
171
172
public final class UsageStatsService extends IUsageStats .Stub
... ...
static IUsageStats sService;
private Context mContext;
final private Map<String, PkgUsageStatsExtended> mStats;
private static final int NUM_LAUNCH_TIME_BINS = 10 ;
private static final int [] LAUNCH_TIME_BINS = {
250 , 500 , 750 , 1000 , 1500 , 2000 , 3000 , 4000 , 5000
};
... ...
static class TimeStats {
int count;
int [] times = new int [NUM_LAUNCH_TIME_BINS];
TimeStats() {
}
void incCount() {
count++;
}
void add(int val) {
final int [] bins = LAUNCH_TIME_BINS;
for (int i=0 ; i<NUM_LAUNCH_TIME_BINS-1 ; i++) {
if (val < bins[i]) {
times[i]++;
return ;
}
}
times[NUM_LAUNCH_TIME_BINS-1 ]++;
}
TimeStats(Parcel in) {
count = in.readInt();
final int [] localTimes = times;
for (int i=0 ; i<NUM_LAUNCH_TIME_BINS; i++) {
localTimes[i] = in.readInt();
}
}
void writeToParcel(Parcel out) {
out.writeInt(count);
final int [] localTimes = times;
for (int i=0 ; i<NUM_LAUNCH_TIME_BINS; i++) {
out.writeInt(localTimes[i]);
}
}
}
private class PkgUsageStatsExtended
final HashMap<String, TimeStats> mLaunchTimes
= new HashMap<String, TimeStats>();
int mLaunchCount;
long mUsageTime;
long mPausedTime;
long mResumedTime;
PkgUsageStatsExtended() {
mLaunchCount = 0 ;
mUsageTime = 0 ;
}
PkgUsageStatsExtended(Parcel in) {
mLaunchCount = in.readInt();
mUsageTime = in.readLong();
if (localLOGV) Slog.v(TAG, "Launch count: " + mLaunchCount
+ ", Usage time:" + mUsageTime);
final int numTimeStats = in.readInt();
if (localLOGV) Slog.v(TAG, "Reading comps: " + numTimeStats);
for (int i=0 ; i<numTimeStats; i++) {
String comp = in.readString();
if (localLOGV) Slog.v(TAG, "Component: " + comp);
TimeStats times = new TimeStats(in);
mLaunchTimes.put(comp, times);
}
}
void updateResume(String comp, boolean launched) {
if (launched) {
mLaunchCount ++;
}
mResumedTime = SystemClock.elapsedRealtime();
}
void updatePause() {
mPausedTime = SystemClock.elapsedRealtime();
mUsageTime += (mPausedTime - mResumedTime);
}
void addLaunchCount(String comp) {
TimeStats times = mLaunchTimes.get(comp);
if (times == null ) {
times = new TimeStats();
mLaunchTimes.put(comp, times);
}
times.incCount();
}
void addLaunchTime(String comp, int millis) {
TimeStats times = mLaunchTimes.get(comp);
if (times == null ) {
times = new TimeStats();
mLaunchTimes.put(comp, times);
}
times.add(millis);
}
void writeToParcel(Parcel out) {
out.writeInt(mLaunchCount);
out.writeLong(mUsageTime);
final int numTimeStats = mLaunchTimes.size();
out.writeInt(numTimeStats);
if (numTimeStats > 0 ) {
for (Map.Entry<String, TimeStats> ent : mLaunchTimes.entrySet()) {
out.writeString(ent.getKey());
TimeStats times = ent.getValue();
times.writeToParcel(out);
}
}
}
void clear() {
mLaunchTimes.clear();
mLaunchCount = 0 ;
mUsageTime = 0 ;
}
}
... ...
}
上面基本上把 USS 的基本数据结构介绍清楚了。其结构是一个 Map,其中以安装了的 pkg 为条,每一条包括:
启动总次数
总共时间时间
pkg 中每个组件启动的次数以及每次启动所需要的时间
为了增加感性认识,dumpsys 一下 usagestats 这个服务能看到磁盘的保存了的 USS 的数据信息:
Date: 20150305
  com.android.systemui: 2 times, 26577889 ms
    com.android.systemui.usb.UsbStorageActivity: 2 starts, 2000-3000ms=2
  com.eebbk.mingming.notificationtest: 1 times, 8625444 ms
    com.eebbk.mingming.notificationtest.MainActivity: 1 starts, 500-750ms=1
  com.bbk.studyos.launcher: 3 times, 11220 ms
    com.bbk.studyos.launcher.activity.Launcher: 3 starts, >=5000ms=1
Date: 20150306
  com.android.systemui: 1 times, 30961918 ms
    com.android.systemui.usb.UsbStorageActivity: 1 starts, 250-500ms=1
  com.bbk.studyos.launcher: 2 times, 8282 ms
    com.bbk.studyos.launcher.activity.Launcher: 2 starts, 2000-3000ms=1
Date: 20150307
  com.android.systemui: 3 times, 445073 ms
    com.android.systemui.usb.UsbStorageActivity: 3 starts, 250-500ms=1, 2000-3000ms=1
  com.android.providers.usagestats: 1 times, 41882 ms
    com.android.providers.usagestats.viewer.UsageStatsViewer: 1 starts, 250-500ms=1
  com.bbk.studyos.launcher: 3 times, 27290376 ms
    com.bbk.studyos.launcher.activity.Launcher: 3 starts, >=5000ms=1
Date: 20150309
  com.android.systemui: 4 times, 6534068 ms
    com.android.systemui.usb.UsbStorageActivity: 4 starts, 250-500ms=2, 2000-3000ms=2
  com.eebbk.systemuimodedemo: 2 times, 612236 ms
    com.eebbk.systemuimodedemo.MainActivity: 2 starts, 750-1000ms=1
  com.eebbk.mingming.notificationtest: 1 times, 1813374 ms
    com.eebbk.mingming.notificationtest.MainActivity: 1 starts, 250-500ms=1
  com.bbk.studyos.launcher: 7 times, 28509 ms
    com.bbk.studyos.launcher.activity.Launcher: 7 starts, 2000-3000ms=1, >=5000ms=2
Date: 20150310
  com.android.systemui: 1 times, 0 ms
    com.android.systemui.usb.UsbStorageActivity: 1 starts, 2000-3000ms=1
  com.bbk.studyos.launcher: 1 times, 1421 ms
    com.bbk.studyos.launcher.activity.Launcher: 1 starts
Date: history.xml (old data version)
(这里仔细看,发现组件启动那里的启动次数和后面的时间段分布有些时候会不对,时间段分别那有时会有少几次的情况出现,后面会知道偶尔出现这种情况的原因)
统计埋点
其实所有的统计流程基本上都是一样的,定下要统计的数据结构,下面就是埋点,然后上报数据,最后服务端保存数据。前面说了埋点是在 AMS 里面的。这里先看看 USS 提供给 AMS 的埋点接口,一共三个:
noteResumeComponent: 通知有组件跑了 Resume 生命周期notePauseComponent: 通知有组件跑了 Pause 生命周期noteLaunchTime: 通知组件的启动时间
下面我们一个一个看:
1
2
3
4
5
6
7
8
9
10
11
12
13
14
15
16
17
18
19
20
21
22
23
24
25
26
27
28
29
30
31
32
33
34
35
36
37
38
39
40
41
42
43
44
45
46
47
48
49
50
51
52
53
54
55
56
57
58
59
60
61
62
63
64
65
66
public void noteResumeComponent (ComponentName componentName) {
enforceCallingPermission();
String pkgName;
synchronized (mStatsLock) {
if ((componentName == null ) ||
((pkgName = componentName.getPackageName()) == null )) {
return ;
}
final boolean samePackage = pkgName.equals(mLastResumedPkg);
if (mIsResumed) {
if (mLastResumedPkg != null ) {
if (REPORT_UNEXPECTED) Slog.i(TAG, "Unexpected resume of " + pkgName
+ " while already resumed in " + mLastResumedPkg);
PkgUsageStatsExtended pus = mStats.get(mLastResumedPkg);
if (pus != null ) {
pus.updatePause();
}
}
}
final boolean sameComp = samePackage
&& componentName.getClassName().equals(mLastResumedComp);
mIsResumed = true ;
mLastResumedPkg = pkgName;
mLastResumedComp = componentName.getClassName();
if (localLOGV) Slog.i(TAG, "started component:" + pkgName);
PkgUsageStatsExtended pus = mStats.get(pkgName);
if (pus == null ) {
pus = new PkgUsageStatsExtended();
mStats.put(pkgName, pus);
}
pus.updateResume(mLastResumedComp, !samePackage);
if (!sameComp) {
pus.addLaunchCount(mLastResumedComp);
}
Map<String, Long> componentResumeTimes = mLastResumeTimes.get(pkgName);
if (componentResumeTimes == null ) {
componentResumeTimes = new HashMap<String, Long>();
mLastResumeTimes.put(pkgName, componentResumeTimes);
}
componentResumeTimes.put(mLastResumedComp, System.currentTimeMillis());
}
}
然后下面是通知 Pause 的:
1
2
3
4
5
6
7
8
9
10
11
12
13
14
15
16
17
18
19
20
21
22
23
24
25
26
27
28
29
30
31
32
33
34
35
36
37
38
39
40
public void notePauseComponent (ComponentName componentName) {
enforceCallingPermission();
synchronized (mStatsLock) {
String pkgName;
if ((componentName == null ) ||
((pkgName = componentName.getPackageName()) == null )) {
return ;
}
if (!mIsResumed) {
if (REPORT_UNEXPECTED) Slog.i(TAG, "Something wrong here, didn't expect "
+ pkgName + " to be paused" );
return ;
}
mIsResumed = false ;
if (localLOGV) Slog.i(TAG, "paused component:" +pkgName);
PkgUsageStatsExtended pus = mStats.get(pkgName);
if (pus == null ) {
Slog.i(TAG, "No package stats for pkg:" +pkgName);
return ;
}
pus.updatePause();
}
writeStatsToFile(false , false );
}
最后是通知启动需要的时间的:
1
2
3
4
5
6
7
8
9
10
11
12
13
14
15
16
17
18
19
20
21
22
23
24
public void noteLaunchTime (ComponentName componentName, int millis) {
enforceCallingPermission();
String pkgName;
if ((componentName == null ) ||
((pkgName = componentName.getPackageName()) == null )) {
return ;
}
writeStatsToFile(false , false );
synchronized (mStatsLock) {
PkgUsageStatsExtended pus = mStats.get(pkgName);
if (pus != null ) {
pus.addLaunchTime(componentName.getClassName(), millis);
}
}
}
这里能看到上面的 noteResume 和 notePause 中会有成对的判断(以后自己处理组件生命周期问题的时候也要多加注意)。还有这里组件启动次数和添加组件启动所需时长信息不在同一个地方,这就能解释为什么偶尔会发现这2个数据个数对不上的问题(埋点的地方不一样,总有几次漏的)。还有上面访问 mStats 和读写文件的锁是分开的,可以学习一下多线程互斥问题的时候,要多想想,不要一遇到互斥问题就所有的代码用一个锁锁住。细分可重入的代码块能提高程序并发访问的能力。
上面埋点的接口,下面我们来看下哪些地方埋了这些点,基本上在 AMS 和 WMS 中(AMS、WMS 的代码十分庞大,请善用 grep 神器)。我们还是分成3个部分来说:
noteResumeComponent
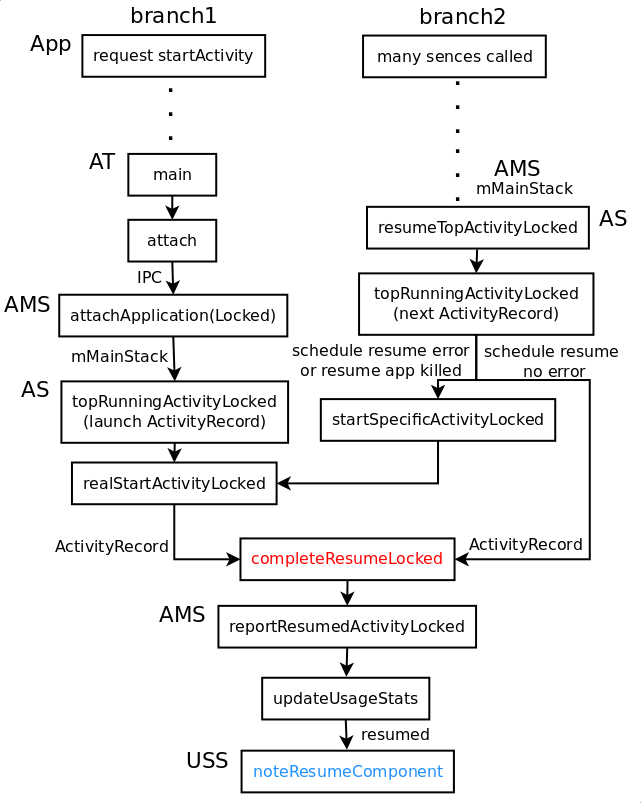
这里我能省略的尽量省略,因为要如何分析 AMS 和 WMS 至少要好几篇才够,先上张图:
Resume 的埋点在 AMS 的 ActivityStack(AS) 的 completeResumeLocked 中。前面一些分析说过 AMS 有一个 activity 的堆栈,相关操作(start activity、resume activity、pause activity 等等)集中在 AS 中。其中 AMS 好像有好几个 AS,但是这里和统计相关的只有一个叫 mMainStack 的主堆栈。大体可以分为2条路:
第一条分支,是比较常见的调用 AMS 的 startActivity 发起的。然后和之前 Binder 的 SS 篇和 Broadcast 篇类似,分为 activity 的进程时候存在。如果不存在,继续走 branch1 后面的。如果进程已经存在,就算 branch 2 前面各种场景调用中的一种,可以直接调用 mMainStack 的 startActivity 相关函数,最后会调用 AS 的 resumeTopActivityLocked 然后去 branch2。这里我们先看进程不存在的情况,告诉 Zygote fork 出进程,然后会跑 ActivityThread(AT) 里面的 main 函数,然后 main 里面会 new AT,然后调用 AT 的 attach 函数,然后会 IPC 调用 AMS 的 attachApplication(Locked)(这些前面那些篇章都分析过了,省略贴代码了)。这里稍微说下 AMS 的 mMainStack(AS) 和 ActivityRecord(AR)这2个东西。在 AMS 的 main 里会创建一个 AS 这里就是主堆栈:
1
2
3
4
5
6
7
8
9
10
11
12
13
14
15
16
17
18
19
20
21
22
23
24
25
26
27
28
29
30
31
32
33
34
35
36
37
public static final Context main (int factoryTest) {
AThread thr = new AThread();
thr.start();
synchronized (thr) {
while (thr.mService == null ) {
try {
thr.wait();
} catch (InterruptedException e) {
}
}
}
ActivityManagerService m = thr.mService;
mSelf = m;
ActivityThread at = ActivityThread.systemMain();
mSystemThread = at;
Context context = at.getSystemContext();
context.setTheme(android.R.style.Theme_Holo);
m.mContext = context;
m.mFactoryTest = factoryTest;
m.mMainStack = new ActivityStack(m, context, true );
m.mBatteryStatsService.publish(context);
m.mUsageStatsService.publish(context);
synchronized (thr) {
thr.mReady = true ;
thr.notifyAll();
}
m.startRunning(null , null , null , null );
return context;
}
然后 AR 这个东西么,经过前面一些 SS 的分析都知道 SS 都喜欢管自己的一些数据结构叫 XxxxRecord(ProcessRecord, ServiceRecord, TaskRecord, BroadcastRecord … …),所以这里的 AR 对应的就是 activity 的记录了。然后在 AS 中的 startActivityLocked 会 new 一个 AR:
1
2
3
4
5
6
7
8
9
10
11
12
13
14
15
16
17
18
19
20
21
22
23
24
25
26
27
28
29
30
31
32
33
34
35
36
37
38
39
40
41
42
43
44
45
46
47
48
49
50
51
52
53
54
55
56
57
58
59
60
final int startActivityLocked(IApplicationThread caller,
Intent intent, String resolvedType, ActivityInfo aInfo, IBinder resultTo,
String resultWho, int requestCode,
int callingPid, int callingUid, int startFlags, Bundle options,
boolean componentSpecified, ActivityRecord[] outActivity) {
int err = ActivityManager.START_SUCCESS;
... ...
ActivityRecord r = new ActivityRecord(mService, this , callerApp, callingUid,
intent, resolvedType, aInfo, mService.mConfiguration,
resultRecord, resultWho, requestCode, componentSpecified);
if (outActivity != null ) {
outActivity[0 ] = r;
}
if (mMainStack) {
if (mResumedActivity == null
|| mResumedActivity.info.applicationInfo.uid != callingUid) {
if (!mService.checkAppSwitchAllowedLocked(callingPid, callingUid, "Activity start" )) {
PendingActivityLaunch pal = new PendingActivityLaunch();
pal.r = r;
pal.sourceRecord = sourceRecord;
pal.startFlags = startFlags;
mService.mPendingActivityLaunches.add(pal);
mDismissKeyguardOnNextActivity = false ;
ActivityOptions.abort(options);
return ActivityManager.START_SWITCHES_CANCELED;
}
}
if (mService.mDidAppSwitch) {
mService.mAppSwitchesAllowedTime = 0 ;
} else {
mService.mDidAppSwitch = true ;
}
mService.doPendingActivityLaunchesLocked(false );
}
err = startActivityUncheckedLocked(r, sourceRecord,
startFlags, true , options);
if (mDismissKeyguardOnNextActivity && mPausingActivity == null ) {
mDismissKeyguardOnNextActivity = false ;
mService.mWindowManager.dismissKeyguard();
}
return err;
}
这里虽然没具体分析 startActivity 的过程,但是我们可以猜到一个 activity 对应一个 AR 记录。并且是在 startActivity 的时候创建的,所以等 AT attach AMS 的时候 AR 取最顶层的 AR 就是当前 startActivity 对应的 AR 记录。所以 AMS 会先调用 mMainStack(AS) topRunningActivityLocked 取顶层的 AR,然后 realStartActivityLocked 去真正的启动 activity:
1
2
3
4
5
6
7
8
9
10
11
12
13
14
15
16
17
18
19
20
21
22
23
24
25
26
27
28
29
30
31
32
33
private final boolean attachApplicationLocked (IApplicationThread thread,
int pid) {
... ...
ActivityRecord hr = mMainStack.topRunningActivityLocked(null );
if (hr != null && normalMode) {
if (hr.app == null && app.uid == hr.info.applicationInfo.uid
&& processName.equals(hr.processName)) {
try {
if (mHeadless) {
Slog.e(TAG, "Starting activities not supported on headless device: " + hr);
} else if (mMainStack.realStartActivityLocked(hr, app, true , true )) {
didSomething = true ;
}
} catch (Exception e) {
Slog.w(TAG, "Exception in new application when starting activity "
+ hr.intent.getComponent().flattenToShortString(), e);
badApp = true ;
}
} else {
mMainStack.ensureActivitiesVisibleLocked(hr, null , processName, 0 );
}
}
... ...
return true ;
}
然后是 AS 里的处理:
1
2
3
4
5
6
7
8
9
10
11
12
13
14
15
16
17
18
19
20
21
22
23
24
25
26
27
28
29
30
31
32
33
34
35
36
37
38
39
40
41
42
43
44
45
46
final boolean realStartActivityLocked(ActivityRecord r,
ProcessRecord app, boolean andResume, boolean checkConfig)
throws RemoteException {
... ...
if (andResume) {
r.state = ActivityState.RESUMED;
if (DEBUG_STATES) Slog.v(TAG, "Moving to RESUMED: " + r
+ " (starting new instance)" );
r.stopped = false ;
mResumedActivity = r;
r.task.touchActiveTime();
if (mMainStack) {
mService.addRecentTaskLocked(r.task);
}
completeResumeLocked(r);
checkReadyForSleepLocked();
if (DEBUG_SAVED_STATE) Slog.i(TAG, "Launch completed; removing icicle of " + r.icicle);
} else {
if (DEBUG_STATES) Slog.v(TAG, "Moving to STOPPED: " + r
+ " (starting in stopped state)" );
r.state = ActivityState.STOPPED;
r.stopped = true ;
}
if (mMainStack) {
mService.startSetupActivityLocked();
}
return true ;
}
然后剩下的流程比较简单,我把代码合并在一起了:
1
2
3
4
5
6
7
8
9
10
11
12
13
14
15
16
17
18
19
20
21
22
23
24
25
26
27
28
29
30
31
32
33
34
35
36
37
38
39
40
41
42
43
44
45
46
47
48
49
50
51
52
53
54
55
56
57
58
59
60
61
62
63
64
65
66
67
68
private final void completeResumeLocked (ActivityRecord next) {
next.idle = false ;
next.results = null ;
next.newIntents = null ;
Message msg = mHandler.obtainMessage(IDLE_TIMEOUT_MSG);
msg.obj = next;
mHandler.sendMessageDelayed(msg, IDLE_TIMEOUT);
if (false ) {
msg = mHandler.obtainMessage(IDLE_NOW_MSG);
msg.obj = next;
mHandler.sendMessage(msg);
}
if (mMainStack) {
mService.reportResumedActivityLocked(next);
}
if (mMainStack) {
mService.setFocusedActivityLocked(next);
}
next.resumeKeyDispatchingLocked();
ensureActivitiesVisibleLocked(null , 0 );
mService.mWindowManager.executeAppTransition();
mNoAnimActivities.clear();
if (next.app != null ) {
synchronized (mService.mProcessStatsThread) {
next.cpuTimeAtResume = mService.mProcessStats.getCpuTimeForPid(next.app.pid);
}
} else {
next.cpuTimeAtResume = 0 ;
}
}
void reportResumedActivityLocked(ActivityRecord r) {
updateUsageStats(r, true );
}
void updateUsageStats(ActivityRecord resumedComponent, boolean resumed) {
if (resumed) {
mUsageStatsService.noteResumeComponent(resumedComponent.realActivity);
} else {
mUsageStatsService.notePauseComponent(resumedComponent.realActivity);
}
}
其实 AS 是 AMS 中分出去的一部分,AS 中还有不少回调用 AMS 的地方的。
分支2的话主要是 AMS 和 AS 中有很多种情况会调用 AS 的 resumeTopActivityLocked,例如说按 Home 键回桌面;当前应用挂了,要恢复前一个应用;或者七七八八别的情况。由于这里主要不是分析 AMS 的地方,所以把这里省略了,主要从 resumeTopActivityLocked 这个入口开始说起(分支1中 startActivity 进程已经存在的情况最后也会走这个地方的)。从这里说其实就比较简单了:
1
2
3
4
5
6
7
8
9
10
11
12
13
14
15
16
17
18
19
20
21
22
23
24
25
26
27
28
29
30
31
32
33
34
35
36
37
38
39
40
41
42
43
44
45
46
47
48
49
50
51
52
53
54
55
56
57
58
59
60
61
62
63
64
65
66
67
68
69
70
71
72
73
74
75
76
77
78
79
80
81
82
83
84
85
86
87
88
89
90
91
92
93
94
95
96
97
98
99
100
101
102
103
104
105
106
107
108
109
110
111
112
113
114
115
116
117
118
119
120
121
122
123
124
125
126
127
128
129
130
131
132
final boolean resumeTopActivityLocked(ActivityRecord prev, Bundle options) {
ActivityRecord next = topRunningActivityLocked(null );
... ...
if (next.app != null && next.app.thread != null ) {
if (DEBUG_SWITCH) Slog.v(TAG, "Resume running: " + next);
mService.mWindowManager.setAppVisibility(next.appToken, true );
next.startLaunchTickingLocked();
ActivityRecord lastResumedActivity = mResumedActivity;
ActivityState lastState = next.state;
mService.updateCpuStats();
if (DEBUG_STATES) Slog.v(TAG, "Moving to RESUMED: " + next + " (in existing)" );
next.state = ActivityState.RESUMED;
mResumedActivity = next;
next.task.touchActiveTime();
if (mMainStack) {
mService.addRecentTaskLocked(next.task);
}
mService.updateLruProcessLocked(next.app, true );
updateLRUListLocked(next);
... ...
try {
ArrayList a = next.results;
if (a != null ) {
final int N = a.size();
if (!next.finishing && N > 0 ) {
if (DEBUG_RESULTS) Slog.v(
TAG, "Delivering results to " + next
+ ": " + a);
next.app.thread.scheduleSendResult(next.appToken, a);
}
}
if (next.newIntents != null ) {
next.app.thread.scheduleNewIntent(next.newIntents, next.appToken);
}
EventLog.writeEvent(EventLogTags.AM_RESUME_ACTIVITY,
next.userId, System.identityHashCode(next),
next.task.taskId, next.shortComponentName);
next.sleeping = false ;
showAskCompatModeDialogLocked(next);
next.app.pendingUiClean = true ;
next.app.thread.scheduleResumeActivity(next.appToken,
mService.isNextTransitionForward());
checkReadyForSleepLocked();
} catch (Exception e) {
if (DEBUG_STATES) Slog.v(TAG, "Resume failed; resetting state to "
+ lastState + ": " + next);
next.state = lastState;
mResumedActivity = lastResumedActivity;
Slog.i(TAG, "Restarting because process died: " + next);
if (!next.hasBeenLaunched) {
next.hasBeenLaunched = true ;
} else {
if (SHOW_APP_STARTING_PREVIEW && mMainStack) {
mService.mWindowManager.setAppStartingWindow(
next.appToken, next.packageName, next.theme,
mService.compatibilityInfoForPackageLocked(
next.info.applicationInfo),
next.nonLocalizedLabel,
next.labelRes, next.icon, next.windowFlags,
null , true );
}
}
startSpecificActivityLocked(next, true , false );
return true ;
}
try {
next.visible = true ;
completeResumeLocked(next);
} catch (Exception e) {
Slog.w(TAG, "Exception thrown during resume of " + next, e);
requestFinishActivityLocked(next.appToken, Activity.RESULT_CANCELED, null ,
"resume-exception" , true );
return true ;
}
next.stopped = false ;
} else {
if (!next.hasBeenLaunched) {
next.hasBeenLaunched = true ;
} else {
if (SHOW_APP_STARTING_PREVIEW) {
mService.mWindowManager.setAppStartingWindow(
next.appToken, next.packageName, next.theme,
mService.compatibilityInfoForPackageLocked(
next.info.applicationInfo),
next.nonLocalizedLabel,
next.labelRes, next.icon, next.windowFlags,
null , true );
}
if (DEBUG_SWITCH) Slog.v(TAG, "Restarting: " + next);
}
startSpecificActivityLocked(next, true , true );
}
return true ;
}
分支2从各种情况调用到 AS 的 resumeTopActivityLocked,然后最后辗转几次还是到了 resume 的埋点函数 completeResumeLocked 这里。然后最后调用 USS 的接口,收集数据。
notePauseComponent
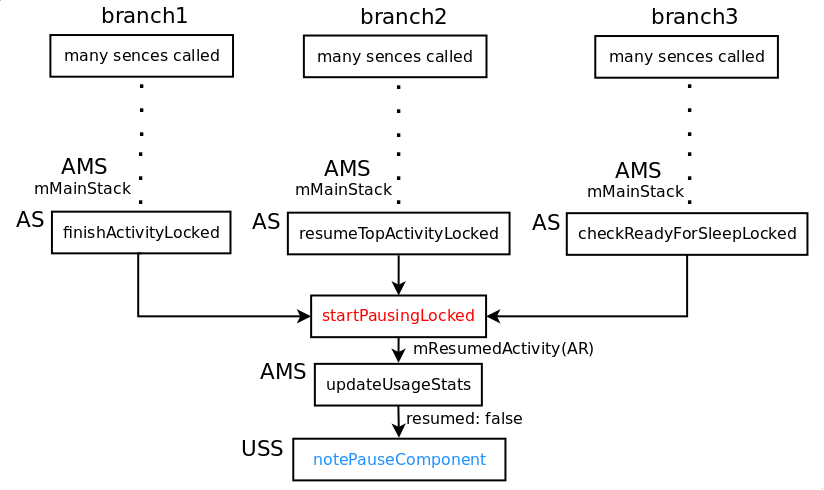
接下来是调用通知 Pause 的接口,也是先上图:
首先从图上看,埋点函数是 AS 的 startPausingLocked:
1
2
3
4
5
6
7
8
9
10
11
12
13
14
15
16
17
18
19
20
21
22
23
24
25
26
27
28
29
30
31
32
33
34
35
36
37
38
39
40
41
42
43
44
45
46
47
48
49
50
51
52
53
54
55
56
57
58
59
60
61
private final void startPausingLocked (boolean userLeaving, boolean uiSleeping) {
if (mPausingActivity != null ) {
RuntimeException e = new RuntimeException();
Slog.e(TAG, "Trying to pause when pause is already pending for "
+ mPausingActivity, e);
}
ActivityRecord prev = mResumedActivity;
if (prev == null ) {
RuntimeException e = new RuntimeException();
Slog.e(TAG, "Trying to pause when nothing is resumed" , e);
resumeTopActivityLocked(null );
return ;
}
if (DEBUG_STATES) Slog.v(TAG, "Moving to PAUSING: " + prev);
else if (DEBUG_PAUSE) Slog.v(TAG, "Start pausing: " + prev);
mResumedActivity = null ;
mPausingActivity = prev;
mLastPausedActivity = prev;
prev.state = ActivityState.PAUSING;
prev.task.touchActiveTime();
prev.updateThumbnail(screenshotActivities(prev), null );
mService.updateCpuStats();
if (prev.app != null && prev.app.thread != null ) {
if (DEBUG_PAUSE) Slog.v(TAG, "Enqueueing pending pause: " + prev);
try {
EventLog.writeEvent(EventLogTags.AM_PAUSE_ACTIVITY,
prev.userId, System.identityHashCode(prev),
prev.shortComponentName);
prev.app.thread.schedulePauseActivity(prev.appToken, prev.finishing,
userLeaving, prev.configChangeFlags);
if (mMainStack) {
mService.updateUsageStats(prev, false );
}
} catch (Exception e) {
Slog.w(TAG, "Exception thrown during pause" , e);
mPausingActivity = null ;
mLastPausedActivity = null ;
}
} else {
mPausingActivity = null ;
mLastPausedActivity = null ;
}
... ...
}
然后调用 AS 埋点函数的大致分为3个分支。每个分支也是 AMS 里面有很多有种情况会调用,照样省略:
分支1 AMS 里面会有很多种情况调用 AS 的 finishActivityLocked,最常见的就是按 back 键或是调用 finishActivity 结束 activity,那按生命周期首先得进入 Pause 状态处理:
1
2
3
4
5
6
7
8
9
10
11
12
13
14
15
16
17
18
19
20
21
22
23
24
25
26
27
28
29
30
31
32
33
34
35
36
37
38
39
40
41
42
43
44
45
46
47
48
49
50
51
52
53
54
55
56
57
final boolean finishActivityLocked(ActivityRecord r, int index,
int resultCode, Intent resultData, String reason, boolean oomAdj) {
return finishActivityLocked(r, index, resultCode, resultData, reason, false , oomAdj);
}
final boolean finishActivityLocked(ActivityRecord r, int index, int resultCode,
Intent resultData, String reason, boolean immediate, boolean oomAdj) {
if (r.finishing) {
Slog.w(TAG, "Duplicate finish request for " + r);
return false ;
}
... ...
if (immediate) {
return finishCurrentActivityLocked(r, index,
FINISH_IMMEDIATELY, oomAdj) == null ;
} else if (mResumedActivity == r) {
boolean endTask = index <= 0
|| (mHistory.get(index-1 )).task != r.task;
if (DEBUG_TRANSITION) Slog.v(TAG,
"Prepare close transition: finishing " + r);
mService.mWindowManager.prepareAppTransition(endTask
? WindowManagerPolicy.TRANSIT_TASK_CLOSE
: WindowManagerPolicy.TRANSIT_ACTIVITY_CLOSE, false );
mService.mWindowManager.setAppVisibility(r.appToken, false );
if (mPausingActivity == null ) {
if (DEBUG_PAUSE) Slog.v(TAG, "Finish needs to pause: " + r);
if (DEBUG_USER_LEAVING) Slog.v(TAG, "finish() => pause with userLeaving=false" );
startPausingLocked(false , false );
}
} else if (r.state != ActivityState.PAUSING) {
if (DEBUG_PAUSE) Slog.v(TAG, "Finish not pausing: " + r);
return finishCurrentActivityLocked(r, index,
FINISH_AFTER_PAUSE, oomAdj) == null ;
} else {
if (DEBUG_PAUSE) Slog.v(TAG, "Finish waiting for pause of: " + r);
}
return false ;
}
分支2的话是前面说过的很多种情况会调用的 AS 的 resumeTopActivityLocked,例如启动一个新的 activity(前面说了会调用 resumeTopActivityLocked 的),就会先让当前处于前台的 activity 进入 Pause 状态:
1
2
3
4
5
6
7
8
9
10
11
12
13
14
15
16
17
18
19
20
21
22
23
24
25
26
27
28
29
30
final boolean resumeTopActivityLocked(ActivityRecord prev, Bundle options) {
ActivityRecord next = topRunningActivityLocked(null );
... ...
if (mResumedActivity != null ) {
if (DEBUG_SWITCH) Slog.v(TAG, "Skip resume: need to start pausing" );
if (next.app != null && next.app.thread != null ) {
mService.updateLruProcessLocked(next.app, false );
}
startPausingLocked(userLeaving, false );
return true ;
}
... ...
return true ;
}
分支3是很多种情况会调用的 AS 的 checkReadyForSleepLocked,好像是用处理休眠的。例如说放一段时间,设备会进入休眠状态,当然得把前台正在运行的 activity 变成 Pause 状态:
1
2
3
4
5
6
7
8
9
10
11
12
13
14
15
16
17
18
19
20
21
22
23
24
25
26
27
28
29
30
31
32
33
34
35
void checkReadyForSleepLocked() {
if (!mService.isSleeping()) {
return ;
}
if (!mSleepTimeout) {
if (mResumedActivity != null ) {
if (DEBUG_PAUSE) Slog.v(TAG, "Sleep needs to pause " + mResumedActivity);
if (DEBUG_USER_LEAVING) Slog.v(TAG, "Sleep => pause with userLeaving=false" );
startPausingLocked(false , true );
return ;
}
if (mPausingActivity != null ) {
if (DEBUG_PAUSE) Slog.v(TAG, "Sleep still waiting to pause " + mPausingActivity);
return ;
}
... ...
}
mHandler.removeMessages(SLEEP_TIMEOUT_MSG);
if (mGoingToSleep.isHeld()) {
mGoingToSleep.release();
}
if (mService.mShuttingDown) {
mService.notifyAll();
}
}
addLaunchTime
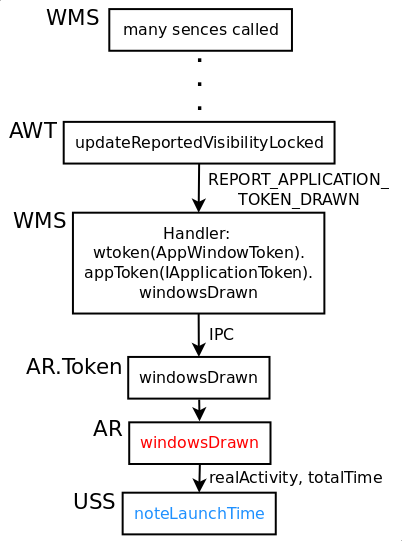
最后是记录启动时长的接口,也先上图:
启动所需时长的埋点函数是 AR 中的 windowsDraw:
1
2
3
4
5
6
7
8
9
10
11
12
13
14
15
16
17
18
19
20
21
22
23
24
25
26
27
28
29
30
31
32
33
34
35
36
37
38
39
40
41
42
43
public void windowsDrawn () {
synchronized (service) {
if (launchTime != 0 ) {
final long curTime = SystemClock.uptimeMillis();
final long thisTime = curTime - launchTime;
final long totalTime = stack.mInitialStartTime != 0
? (curTime - stack.mInitialStartTime) : thisTime;
if (ActivityManagerService.SHOW_ACTIVITY_START_TIME) {
EventLog.writeEvent(EventLogTags.AM_ACTIVITY_LAUNCH_TIME,
userId, System.identityHashCode(this ), shortComponentName,
thisTime, totalTime);
StringBuilder sb = service.mStringBuilder;
sb.setLength(0 );
sb.append("Displayed " );
sb.append(shortComponentName);
sb.append(": " );
TimeUtils.formatDuration(thisTime, sb);
if (thisTime != totalTime) {
sb.append(" (total " );
TimeUtils.formatDuration(totalTime, sb);
sb.append(")" );
}
Log.i(ActivityManagerService.TAG, sb.toString());
}
stack.reportActivityLaunchedLocked(false , this , thisTime, totalTime);
if (totalTime > 0 ) {
service.mUsageStatsService.noteLaunchTime(realActivity, (int )totalTime);
}
launchTime = 0 ;
stack.mInitialStartTime = 0 ;
}
startTime = 0 ;
finishLaunchTickingLocked();
}
}
这里 AR 的 launchTime 和对应的 AS(mMainStack) 的 mInitialStartTime 是在 AS 的 startSpecificActivityLocked 中设置的:
1
2
3
4
5
6
7
8
9
10
11
12
13
14
15
16
17
18
19
20
21
private final void startSpecificActivityLocked (ActivityRecord r,
boolean andResume, boolean checkConfig) {
ProcessRecord app = mService.getProcessRecordLocked(r.processName,
r.info.applicationInfo.uid);
if (r.launchTime == 0 ) {
r.launchTime = SystemClock.uptimeMillis();
if (mInitialStartTime == 0 ) {
mInitialStartTime = r.launchTime;
}
} else if (mInitialStartTime == 0 ) {
mInitialStartTime = SystemClock.uptimeMillis();
}
... ...
}
然后我们来看下在哪里调用了 startSpecificActivityLocked 这个函数。从 AMS 的 startActivity 开始,如果是第一次启动 activity,AS 中的 startActivityLocked 会创建新的 AR,然后转几下(什么 startActivityUncheckedLocked 什么之类的,中间很麻烦的,以后分析 AMS 的时候再具体说),最后到 resumeTopActivityLocked,由于这个时候 AR 的 app 信息是 null (第一次,进程还没跑)的就会调用到 startSpecificActivityLocked,然后由于 app 信息为 null,最后再调用到 AMS 的 startProcessLocked 去让 Zygote 去 fork 进程,然后就是前面 noteResumeComponent 的分支1流程了。如果不是第一次启动,然后进程信息还在(也就是 noteResumeComponent 的分支2),那么也会跑 startSpecificActivityLocked 的。
所以不管时候需要启动进程,startActivity 都要跑 startSpecificActivityLocked 这个函数,然后开始启动 activity 的计时(从这里可以看得出如果需要启动进程的话,计时肯定会很长的)。
弄清楚了从那开始计算时间,那么我看看在那结束计时的。从上面图来看,是在 WMS 中结束统计时长的,WMS 每一个 window 都有一个 AppWindowToken(AWT) 的结构,这个结构里面有一个 updateReportedVisibilityLocked 函数:
1
2
3
4
5
6
7
8
9
10
11
12
13
14
15
16
17
18
19
20
21
22
23
24
25
26
27
28
29
30
31
32
33
34
35
36
37
38
39
40
41
42
43
44
45
46
47
48
49
50
51
52
53
54
55
56
57
58
59
60
61
62
63
64
65
66
67
68
69
70
71
72
73
74
75
76
77
78
79
80
81
82
83
84
85
void updateReportedVisibilityLocked() {
if (appToken == null ) {
return ;
}
int numInteresting = 0 ;
int numVisible = 0 ;
int numDrawn = 0 ;
boolean nowGone = true ;
if (WindowManagerService.DEBUG_VISIBILITY) Slog.v(WindowManagerService.TAG,
"Update reported visibility: " + this );
final int N = allAppWindows.size();
for (int i=0 ; i<N; i++) {
WindowState win = allAppWindows.get(i);
if (win == startingWindow || win.mAppFreezing
|| win.mViewVisibility != View.VISIBLE
|| win.mAttrs.type == TYPE_APPLICATION_STARTING
|| win.mDestroying) {
continue ;
}
if (WindowManagerService.DEBUG_VISIBILITY) {
Slog.v(WindowManagerService.TAG, "Win " + win + ": isDrawn="
+ win.isDrawnLw()
+ ", isAnimating=" + win.mWinAnimator.isAnimating());
if (!win.isDrawnLw()) {
Slog.v(WindowManagerService.TAG, "Not displayed: s=" + win.mWinAnimator.mSurface
+ " pv=" + win.mPolicyVisibility
+ " mDrawState=" + win.mWinAnimator.mDrawState
+ " ah=" + win.mAttachedHidden
+ " th="
+ (win.mAppToken != null
? win.mAppToken.hiddenRequested : false )
+ " a=" + win.mWinAnimator.mAnimating);
}
}
numInteresting++;
if (win.isDrawnLw()) {
numDrawn++;
if (!win.mWinAnimator.isAnimating()) {
numVisible++;
}
nowGone = false ;
} else if (win.mWinAnimator.isAnimating()) {
nowGone = false ;
}
}
boolean nowDrawn = numInteresting > 0 && numDrawn >= numInteresting;
boolean nowVisible = numInteresting > 0 && numVisible >= numInteresting;
if (!nowGone) {
if (!nowDrawn) {
nowDrawn = reportedDrawn;
}
if (!nowVisible) {
nowVisible = reportedVisible;
}
}
if (WindowManagerService.DEBUG_VISIBILITY) Slog.v(WindowManagerService.TAG, "VIS " + this + ": interesting="
+ numInteresting + " visible=" + numVisible);
if (nowDrawn != reportedDrawn) {
if (nowDrawn) {
Message m = service.mH.obtainMessage(
H.REPORT_APPLICATION_TOKEN_DRAWN, this );
service.mH.sendMessage(m);
}
reportedDrawn = nowDrawn;
}
if (nowVisible != reportedVisible) {
if (WindowManagerService.DEBUG_VISIBILITY) Slog.v(
WindowManagerService.TAG, "Visibility changed in " + this
+ ": vis=" + nowVisible);
reportedVisible = nowVisible;
Message m = service.mH.obtainMessage(
H.REPORT_APPLICATION_TOKEN_WINDOWS,
nowVisible ? 1 : 0 ,
nowGone ? 1 : 0 ,
this );
service.mH.sendMessage(m);
}
}
然后是 WMS 里面的 Handler 处理:
1
2
3
4
5
6
7
8
9
10
11
12
case REPORT_APPLICATION_TOKEN_DRAWN: {
final AppWindowToken wtoken = (AppWindowToken)msg.obj;
try {
if (DEBUG_VISIBILITY) Slog.v(
TAG, "Reporting drawn in " + wtoken);
wtoken.appToken.windowsDrawn();
} catch (RemoteException ex) {
}
} break ;
懒得说 Binder 那些东西了,忘了的自觉去 Binder 篇相关的东西,直接上 AR 中相关的东西:
1
2
3
4
5
6
7
8
9
10
11
12
13
14
15
16
17
18
19
static class Token extends IApplicationToken.Stub {
final WeakReference<ActivityRecord> weakActivity;
Token(ActivityRecord activity) {
weakActivity = new WeakReference<ActivityRecord>(activity);
}
@Override public void windowsDrawn () throws RemoteException {
ActivityRecord activity = weakActivity.get();
if (activity != null ) {
activity.windowsDrawn();
}
}
... ...
}
上面 AWP 的 updateReportedVisibilityLocked 在 WMS 中也是有很多地方会调用的,例如 relayoutWindow、开始窗口变化动画等等地方。从这里可以看得出,USS 中统计 activity 启动需要的时间,是从发起 startActivity 请求(startSpecificActivityLocked)开始,直到对应 activity 的窗口开始绘制(窗口可见)这段时间。
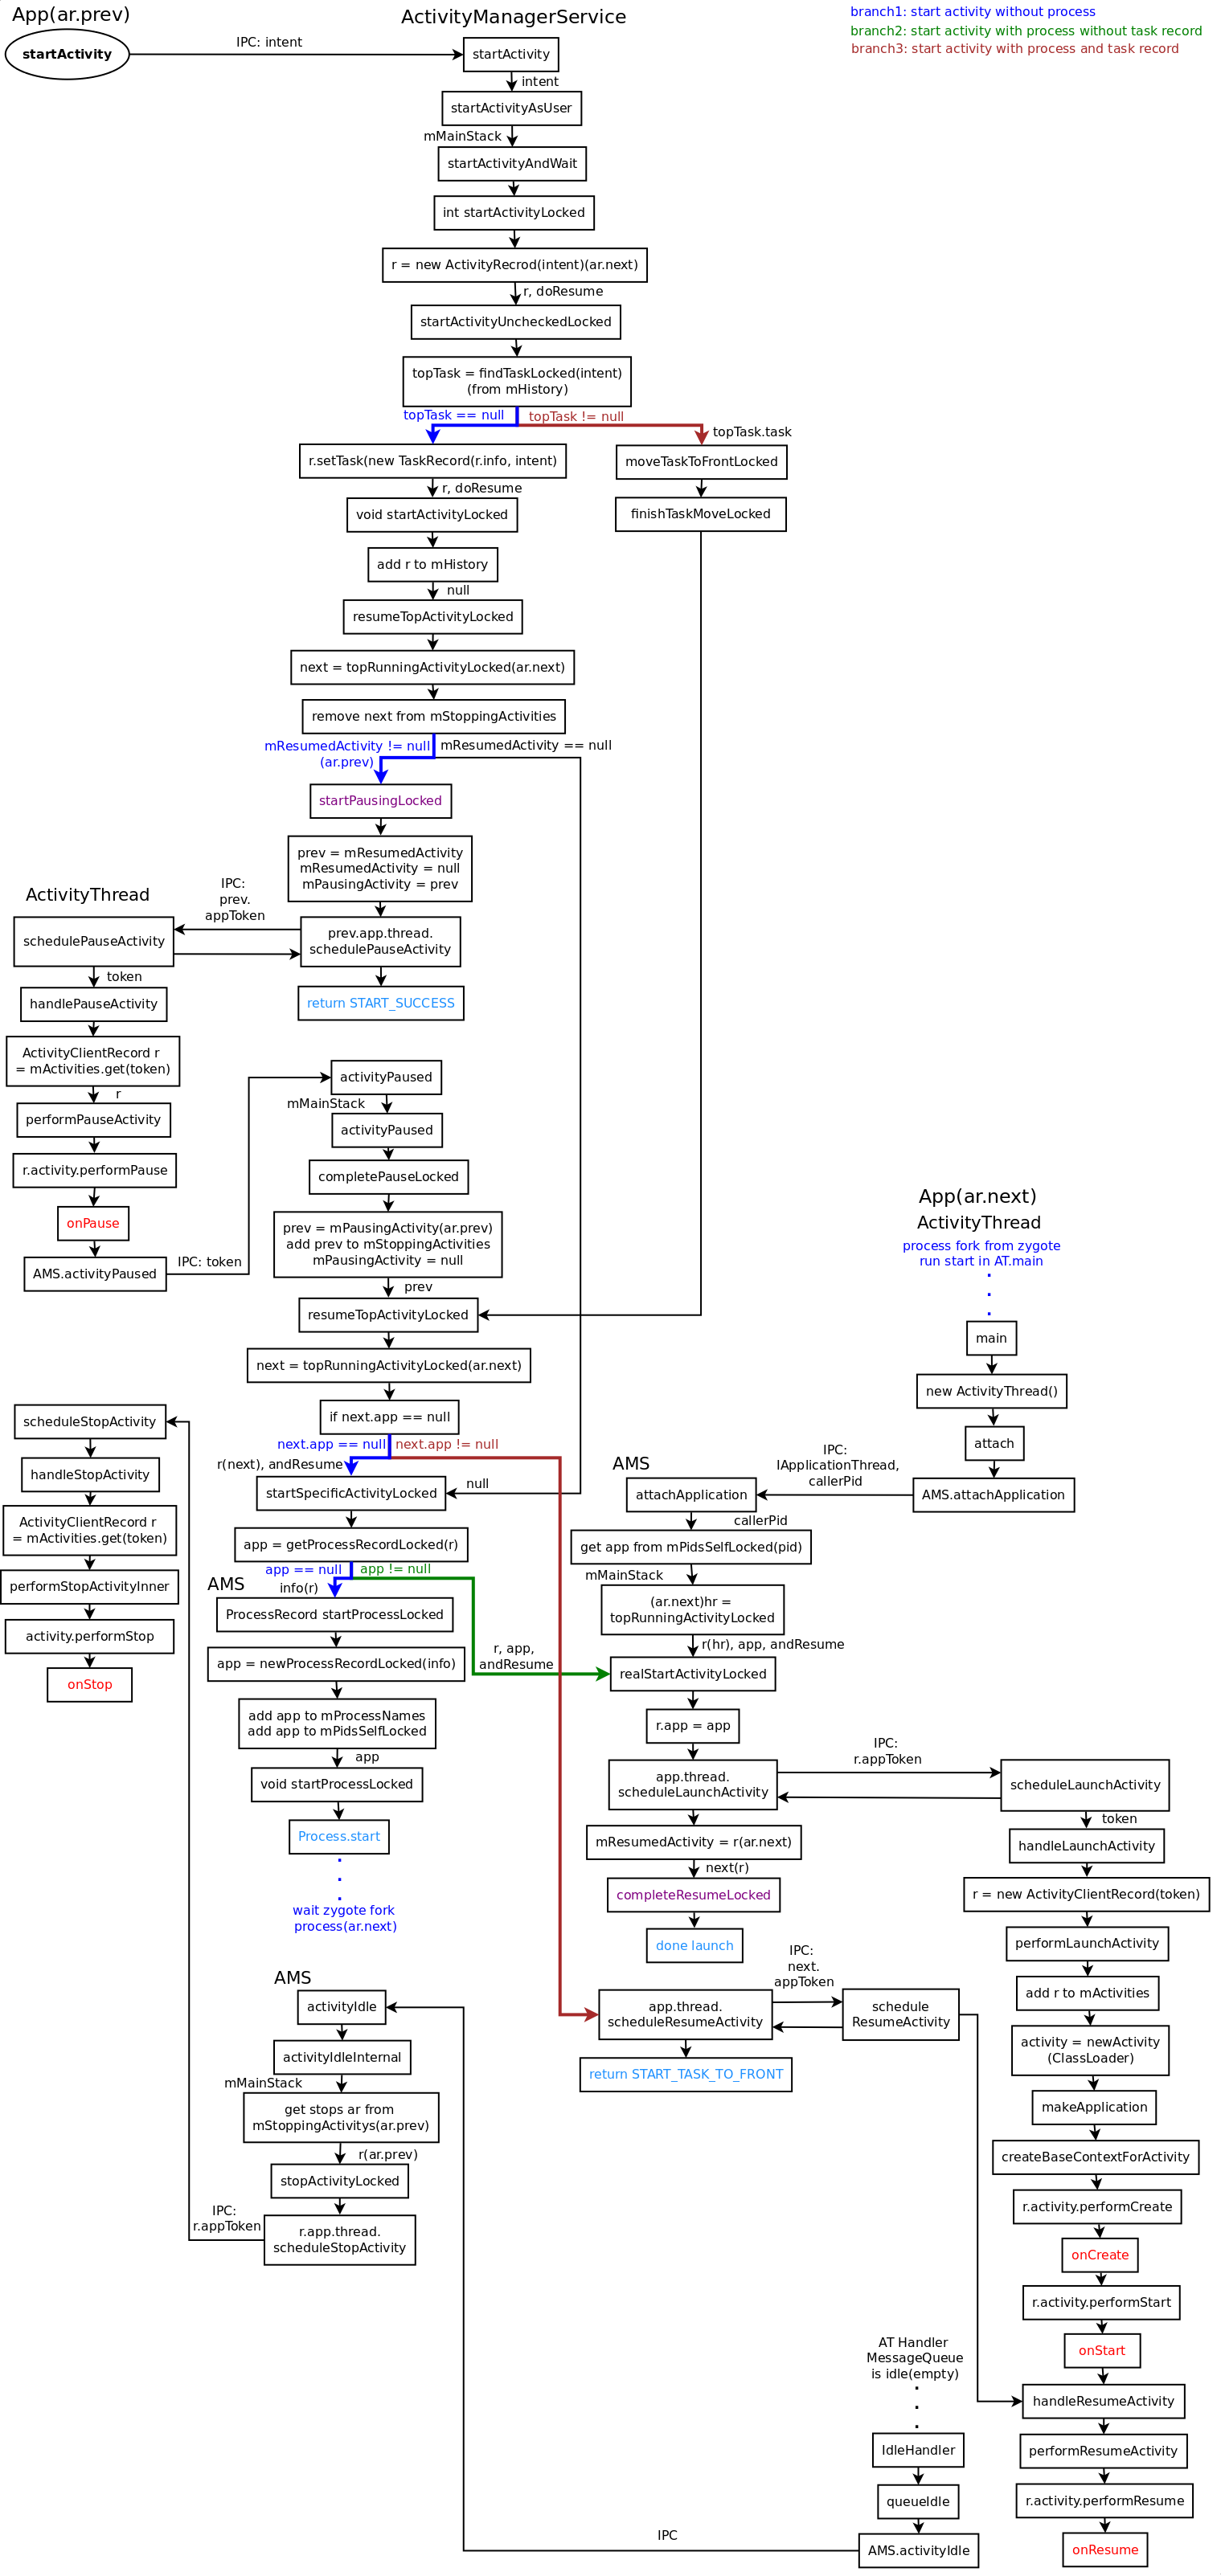
AMS 小分析
这里算是把3个接口的埋点分析完了。本来说 AMS 和 WMS 太复杂了,留给以后再慢慢来看,但是没忍住还是稍微把 startActivity 的一般流程分析了一下,来一张图:
这里就不上代码解说了,这篇已经够长了,看看图差不多大概明白流程是怎么回事了。图中我画了比较常见的3种情况(所有情况没画全,太多分支了):
branch1:
branch2:
branch3:
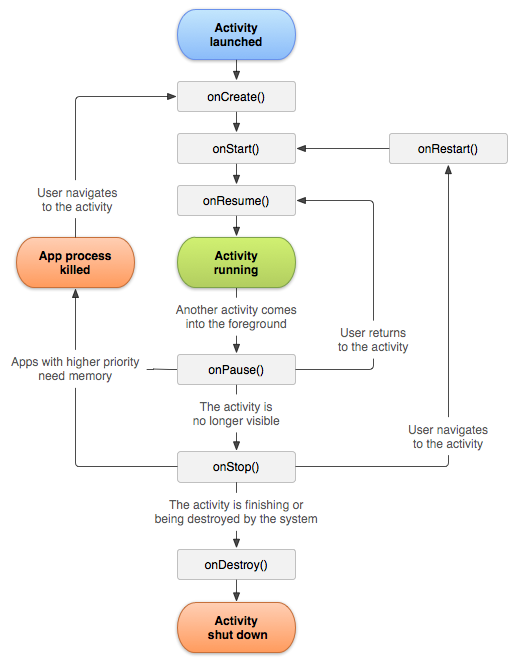
上面我把我们开发应用熟悉的 activity 的那几个生命周期回调用红色标了出来,上面的埋点函数用紫色的标了一下,大家可以对比前面的解说再好好看看。最后上一个官方 sdk doc 上的 activity 的生命周期图,对 android activity 生命周期实现、管理有更加深入的理解:
然后再附上一段官方的说明:
The entire lifetime of an activity happens between the first call to onCreate(Bundle) through to a single final call to onDestroy(). An activity will do all setup of “global” state in onCreate(), and release all remaining resources in onDestroy() . For example, if it has a thread running in the background to download data from the network, it may create that thread in onCreate() and then stop the thread in onDestroy().
The visible lifetime of an activity happens between a call to onStart() until a corresponding call to onStop() . During this time the user can see the activity on-screen, though it may not be in the foreground and interacting with the user. Between these two methods you can maintain resources that are needed to show the activity to the user. For example, you can register a BroadcastReceiver in onStart() to monitor for changes that impact your UI, and unregister it in onStop() when the user no longer sees what you are displaying. The onStart() and onStop() methods can be called multiple times, as the activity becomes visible and hidden to the user.
The foreground lifetime of an activity happens between a call to onResume() until a corresponding call to onPause() . During this time the activity is in front of all other activities and interacting with the user. An activity can frequently go between the resumed and paused states — for example when the device goes to sleep, when an activity result is delivered, when a new intent is delivered — so the code in these methods should be fairly lightweight.
从 onCreate 到 onDestroy 算是 activity 的存在时间,从 onStart 到 onStop 算是 activity 处于可见的时间,从 onResume 到 onPause 算是 activity 的处于前台的时间。这里比较迷惑的是可见时间和处于前台的时候。这里稍微说明下,所谓处于前台是处于当前 activity 堆栈(AS)的最顶部,能够接收输入焦点,例如说正在交互的 activity。那所谓的可见时间呢,其实有些时候就算 activity 不在 AS 的最顶部,也是可见的,最典型的情况上当前正在交互的 activity 是个半透明的,所以它下面那个 activity 是可见的,但是不处于前台(处于 onPause 状态,但是没还到 onStop 状态)。所以上面的图,可见时间比前台时间要长就是这个原因。从这个来看 USS 统计的启动时长,感觉像是从 onCreate 到 onStart 那段时间。我本来还以为 onStart 要涉及 WMS,等待窗口开始绘制才会调用的,但是好像并不是我想的那样,就是在 onCreate 后几句就调用 onRestart,不过在 onStop 后还是有区别的,在 activity 的存在周期,onCreate 只会调用一次,但是 onStart 可能会有多次。
还有上面 onStop 这个回调的时间很有意思,官方的解说是: activity no longer visible。怎么才算 no longer visible ?? 看上面的流程图会发现,当 activity 开始 Pasuing 流程的时候,AR 会保存到一个叫 mStopActivites 的列表中(进行 Resume 的时候会从里面删掉自己)。然后当一个 activity 的主线程(UI 线程)的 Handler 的消息队列(MessageQueue)为空的时候会激发一个 IdlerHandler 的回调(每个程序的 ActivityThread 会设置这个回调),它会向 AMS 报告 activity idle 消息,在 idle 消息处理中会查看 mStopActivites 中哪里 AR 可以进入 Stop 状态(进入之后会从 mStopActivites 中删除,AMS 的 idle 处理还有别的工作要做,这里只说 stop 处理)。其实激发 AMS activity idle 的地方还有别的地方,但是 Handler idle 是一个比较典型的地方。我说之前看到 Handler 的 MessageQueue 那有个啥 idle handler 的处理,不知道干什么,现在知道了。
所以这里可以知道一个比较好玩的东西,就是 android 认为 UI 线程的消息队列为空,就代表这个 activity 空闲了。其实这个设定也是合理的因为上层的应用交互都是基于消息队列驱动的。然后也明白了 no longer 是要等 activity 的 UI 线程的消息队列为空。以后有空把 Handler、Looper、MessageQueue 也好好整理分析下。
保存数据
上面扯了一下 AMS 相关的流程(因为 USS 埋点要在 AMS 里面埋),现在回来把数据保存说一下。前面在说数据结构那,把 USS 保存过的数据 dump 出来了,然后它的结构就是一个 Map,以 pkg 为 key,一个 pkg 一条。然后每条里面有一个 TimeStats 的东西,又包含了一个 HashMap 以 ComponentName 为 key,一个 component 一条,所以从逻辑上来说内存结构应该是这样的(前面 dump 出来的数据也很直观了):
pkg1:
这里的保存,就是要把内存中的这些数据写到文件中。看到这个,在 android 中你就要想到 Parcel 要出场了。其实前面说数据结构的时候,就看到 PkgUsageStatsExtended 和 TimeStats 都有对应的 Parcelable 的函数(倒回去看一下)。先把这些说清楚,后面看起保存数据的代码就简单了。在上面埋点统计那,notePauseComponent 和 noteLaunchTime 会调用有一个函数 writeStatsToFile(代码不算太长,一次性贴完了):
1
2
3
4
5
6
7
8
9
10
11
12
13
14
15
16
17
18
19
20
21
22
23
24
25
26
27
28
29
30
31
32
33
34
35
36
37
38
39
40
41
42
43
44
45
46
47
48
49
50
51
52
53
54
55
56
57
58
59
60
61
62
63
64
65
66
67
68
69
70
71
72
73
74
75
76
77
78
79
80
81
82
83
84
85
86
87
88
89
90
91
92
93
94
95
96
97
98
99
100
101
102
103
104
105
106
107
108
109
110
111
112
113
114
115
116
117
118
119
120
121
122
123
124
125
126
127
128
129
130
131
132
133
134
135
136
137
138
139
140
141
142
143
144
145
146
147
148
149
150
151
152
153
154
155
156
157
158
159
160
161
162
163
164
165
166
167
168
169
170
171
172
173
174
175
176
177
178
179
180
181
182
183
184
185
186
187
188
189
190
191
192
193
194
195
196
197
198
199
200
201
202
203
204
205
206
207
private static final String FILE_PREFIX = "usage-" ;
private static final int FILE_WRITE_INTERVAL = 30 *60 *1000 ;
... ...
private Calendar mCal;
private final AtomicInteger mLastWriteDay = new AtomicInteger(-1 );
private final AtomicLong mLastWriteElapsedTime = new AtomicLong(0 );
private final AtomicBoolean mUnforcedDiskWriteRunning = new AtomicBoolean(false );
... ...
private void writeStatsToFile (final boolean force, final boolean forceWriteHistoryStats) {
int curDay;
synchronized (mCal) {
mCal.setTimeInMillis(System.currentTimeMillis());
curDay = mCal.get(Calendar.DAY_OF_YEAR);
}
final boolean dayChanged = curDay != mLastWriteDay.get();
final long currElapsedTime = SystemClock.elapsedRealtime();
if (!force) {
if (!dayChanged &&
(currElapsedTime - mLastWriteElapsedTime.get()) < FILE_WRITE_INTERVAL) {
return ;
}
if (mUnforcedDiskWriteRunning.compareAndSet(false , true )) {
new Thread("UsageStatsService_DiskWriter" ) {
public void run () {
try {
if (localLOGV) Slog.d(TAG, "Disk writer thread starting." );
writeStatsToFile(true , false );
} finally {
mUnforcedDiskWriteRunning.set(false );
if (localLOGV) Slog.d(TAG, "Disk writer thread ending." );
}
}
}.start();
}
return ;
}
synchronized (mFileLock) {
mFileLeaf = getCurrentDateStr(FILE_PREFIX);
File backupFile = null ;
if (mFile != null && mFile.exists()) {
backupFile = new File(mFile.getPath() + ".bak" );
if (!backupFile.exists()) {
if (!mFile.renameTo(backupFile)) {
Slog.w(TAG, "Failed to persist new stats" );
return ;
}
} else {
mFile.delete();
}
}
try {
writeStatsFLOCK(mFile);
mLastWriteElapsedTime.set(currElapsedTime);
if (dayChanged) {
mLastWriteDay.set(curDay);
synchronized (mStats) {
mStats.clear();
}
mFile = new File(mDir, mFileLeaf);
checkFileLimitFLOCK();
}
if (dayChanged || forceWriteHistoryStats) {
writeHistoryStatsFLOCK(mHistoryFile);
}
if (backupFile != null ) {
backupFile.delete();
}
} catch (IOException e) {
Slog.w(TAG, "Failed writing stats to file:" + mFile);
if (backupFile != null ) {
mFile.delete();
backupFile.renameTo(mFile);
}
}
}
if (localLOGV) Slog.d(TAG, "Dumped usage stats." );
}
private void writeStatsFLOCK (File file) throws IOException {
FileOutputStream stream = new FileOutputStream(file);
try {
Parcel out = Parcel.obtain();
writeStatsToParcelFLOCK(out);
stream.write(out.marshall());
out.recycle();
stream.flush();
} finally {
FileUtils.sync(stream);
stream.close();
}
}
private void writeStatsToParcelFLOCK (Parcel out) {
synchronized (mStatsLock) {
out.writeInt(VERSION);
Set<String> keys = mStats.keySet();
out.writeInt(keys.size());
for (String key : keys) {
PkgUsageStatsExtended pus = mStats.get(key);
out.writeString(key);
pus.writeToParcel(out);
}
}
}
public static boolean sync (FileOutputStream stream) {
try {
if (stream != null ) {
stream.getFD().sync();
}
return true ;
} catch (IOException e) {
}
return false ;
}
下面是从文件中读数据的接口:
1
2
3
4
5
6
7
8
9
10
11
12
13
14
15
16
17
18
19
20
21
22
23
24
25
26
27
28
29
30
31
32
33
34
35
36
37
38
39
40
41
42
43
44
45
46
47
48
49
50
51
52
53
54
55
56
57
58
59
60
61
62
63
64
65
66
67
68
69
70
71
72
73
74
75
76
77
78
79
80
81
82
83
84
85
86
87
88
89
90
91
92
93
private void readStatsFromFile () {
File newFile = mFile;
synchronized (mFileLock) {
try {
if (newFile.exists()) {
readStatsFLOCK(newFile);
} else {
checkFileLimitFLOCK();
newFile.createNewFile();
}
} catch (IOException e) {
Slog.w(TAG,"Error : " + e + " reading data from file:" + newFile);
}
}
}
private void readStatsFLOCK (File file) throws IOException {
Parcel in = getParcelForFile(file);
int vers = in.readInt();
if (vers != VERSION) {
Slog.w(TAG, "Usage stats version changed; dropping" );
return ;
}
int N = in.readInt();
while (N > 0 ) {
N--;
String pkgName = in.readString();
if (pkgName == null ) {
break ;
}
if (localLOGV) Slog.v(TAG, "Reading package #" + N + ": " + pkgName);
PkgUsageStatsExtended pus = new PkgUsageStatsExtended(in);
synchronized (mStatsLock) {
mStats.put(pkgName, pus);
}
}
}
private Parcel getParcelForFile (File file) throws IOException {
FileInputStream stream = new FileInputStream(file);
byte [] raw = readFully(stream);
Parcel in = Parcel.obtain();
in.unmarshall(raw, 0 , raw.length);
in.setDataPosition(0 );
stream.close();
return in;
}
static byte [] readFully(FileInputStream stream) throws java.io.IOException {
int pos = 0 ;
int avail = stream.available();
byte [] data = new byte [avail];
while (true ) {
int amt = stream.read(data, pos, data.length-pos);
if (amt <= 0 ) {
return data;
}
pos += amt;
avail = stream.available();
if (avail > data.length-pos) {
byte [] newData = new byte [pos+avail];
System.arraycopy(data, 0 , newData, 0 , pos);
data = newData;
}
}
}
然后我们看下文件数量的限制方法:
1
2
3
4
5
6
7
8
9
10
11
12
13
14
15
16
17
18
19
20
21
22
23
24
25
26
27
28
29
30
31
32
33
34
35
36
37
38
39
40
41
42
43
44
45
46
47
48
49
50
51
52
53
54
55
56
57
... ...
private static final int MAX_NUM_FILES = 5 ;
... ...
private ArrayList<String> getUsageStatsFileListFLOCK () {
String fList[] = mDir.list();
if (fList == null ) {
return null ;
}
ArrayList<String> fileList = new ArrayList<String>();
for (String file : fList) {
if (!file.startsWith(FILE_PREFIX)) {
continue ;
}
if (file.endsWith(".bak" )) {
(new File(mDir, file)).delete();
continue ;
}
fileList.add(file);
}
return fileList;
}
private void checkFileLimitFLOCK () {
ArrayList<String> fileList = getUsageStatsFileListFLOCK();
if (fileList == null ) {
return ;
}
int count = fileList.size();
if (count <= MAX_NUM_FILES) {
return ;
}
Collections.sort(fileList);
count -= MAX_NUM_FILES;
for (int i = 0 ; i < count; i++) {
String fileName = fileList.get(i);
File file = new File(mDir, fileName);
Slog.i(TAG, "Deleting usage file : " + fileName);
file.delete();
}
}
看完上面的了保存和读取接口,然后我们最后把 USS 调用到的地方看一下(这里不贴代码了,直接说那几个地方调用到了,用 grep 很容易找的):
调用写(writeStatsToFile)的地方有:(调试的地方不算, true 代表强制写,false 使用保存策略)
shutdown: true
notePauseComponent: false
noteLaunchTime: false
调用读(readStatsFromFile)的地方有:
UsageStatsService
总结一下就能发现 USS 特性: 在收到 notePauseComponent 和 noteLaunchTime 的时候会激发保存动作,策略基本上是一天保存一次,一次保存为一个文件(以日期命名)。成功保存完之后,会把内存中的数据清零,所以一个文件中的数据差不多是一天统计的数据。但是上面在 USS 关闭(重启、关机 SystemServce 会调用各个 SS 的 shutdown 函数)的时候会强制写数据,然后在初始化的时候(构造函数)取当前日期的文件,如果有就去把这个文件中的数据转载到 mStats 中去(相当于读档)。这个操作能保证设备在还没用满一天的情况下重启、关机数据也能保存(正常的是要过了一天才会激发写文件操作的)。然后默认只会保留最近5天的数据,超过了就会删掉之前的。
搞清楚了 USS 的保存数据的方法和策略,我们最后来看实际数据的情况,加深一下理解。下面这张图就是 USS 一天的数据(拿 xxd 转化为 16进制,用 vi 打开),然后对应下 dump 的数据:
Date: 20150306
  com.android.systemui: 1 times, 30961918 ms
    com.android.systemui.usb.UsbStorageActivity: 1 starts, 250-500ms=1
  com.bbk.studyos.launcher: 2 times, 8282 ms
    com.bbk.studyos.launcher.activity.Launcher: 2 starts, 2000-3000ms=1
Binder 系列 Parcel 篇我们分析过 Parcel 就是一块内存自己来写,我们对着内存中的数据一个一个对照看一下。最开始写入的是版本号:
1
2
3
private static final int VERSION = 1007 ;
0x0000 03ef(注意一下,我手上机子的 cpu 是小端格式的)正好是 1007,writeInt 前面说过是 4byte 的(绿色部分)。然后接下来是 PkgUsageStatsExtended 的个数,0x0000 0002 是2个,看 dump 的输出,果然是2个,同样是 WriteInt 4byte(深蓝色部分)。接下来就是第一个 PkgUsageStatsExtended 的 pkg name,是用 writeString 写的(红色的部分)。这里我们补充下 Parcel 的一些知识:
1
2
3
4
5
6
7
8
9
10
11
12
13
14
15
16
17
18
19
20
21
22
23
24
25
26
27
28
29
30
31
32
33
34
35
36
37
38
39
40
41
42
43
44
45
46
47
48
49
50
51
52
53
54
55
56
57
58
59
60
61
62
63
64
65
66
67
68
69
70
71
72
73
74
75
76
77
78
79
80
81
82
83
84
85
86
87
88
public final void writeString (String val) {
nativeWriteString(mNativePtr, val);
}
static void android_os_Parcel_writeString(JNIEnv* env, jclass clazz, jint nativePtr, jstring val)
{
Parcel* parcel = reinterpret_cast<Parcel*>(nativePtr);
if (parcel != NULL) {
status_t err = NO_MEMORY;
if (val) {
const jchar* str = env->GetStringCritical(val, 0 );
if (str) {
err = parcel->writeString16(str, env->GetStringLength(val));
env->ReleaseStringCritical(val, str);
}
} else {
err = parcel->writeString16(NULL, 0 );
}
if (err != NO_ERROR) {
signalExceptionForError(env, clazz, err);
}
}
}
status_t Parcel::writeString16(const char16_t* str, size_t len)
{
if (str == NULL) return writeInt32(-1 );
status_t err = writeInt32(len);
if (err == NO_ERROR) {
len *= sizeof(char16_t);
uint8_t* data = (uint8_t*)writeInplace(len+sizeof(char16_t));
if (data) {
memcpy(data, str, len);
*reinterpret_cast<char16_t*>(data+len) = 0 ;
return NO_ERROR;
}
err = mError;
}
return err;
}
String16 Parcel::readString16() const
{
size_t len;
const char16_t* str = readString16Inplace(&len);
if (str) return String16(str, len);
ALOGE("Reading a NULL string not supported here." );
return String16();
}
const char16_t* Parcel::readString16Inplace(size_t* outLen) const
{
int32_t size = readInt32();
if (size >= 0 && size < INT32_MAX) {
*outLen = size;
const char16_t* str = (const char16_t*)readInplace((size+1 )*sizeof(char16_t));
if (str != NULL) {
return str;
}
}
*outLen = 0 ;
return NULL;
}
typedef uint32_t char32_t;
typedef uint16_t char16_t;
看到上面 WriteString16 和 定义头文件的 Unicode 就能猜到 java 里面的 String 用的是 UCS-2(2byte 的unicode 编码,忘记了的去 unicode 编码表 看看)。
好补充了上面的知识我们再接着看 pkg name。一开始长度: 0x0000 0014,20个字符,从 0x0063(”c” 的 UCS-2 码) 到红色最后一排那个 0x0069(”i” 的 UCS-2 码) 正好是 20 个(2byte x 20 = 40byte, 0x000000ch ~ 0x0000033h)。UCS-2 使用2个byte来代码一个码,如果是字母的就是 ACSII 的值,从右侧的显示也能看出是: com.android.systemui。但是这里稍微注意下,红色的部分,多个了2个 0x0000,第一个从前面 Parcel 的代码我们知道是 ‘/0’ 字符串结束符。但是怎么还多了一个出来?还记得 Parcel 篇说过 Parcel 数据都会 4byte 对齐的么,如果不算后面那个 0x0000 的话,我们算算看原来的数据是多少: 4byte(1个 32bit int len) + 40byte(20个 16bit UCS-2 字符) + 2byte(1个 16bit UCS-2 结束符)= 46byte,46 % 4 = 2,所以最后还要补上 2byte 作为 4byte 对齐用的。这里结合实际终能稍微能明白点字节对齐了。
补充完 Parcel 知识,继续往下看。倒回去看下 PkgUsageStatsExtended 的 writeToParcel 接口:
黄色部分, 4byte(writeInt), mLaunchTime(启动次数),0x0000 0001,1次
然后后面就是循环写 TimeStats 了,和 PkgUsageStatsExtended 差不多一开始是 component name:红色部分,前面详细说了 pkg name 这里不多说了,照着前面的方法自己对照一下吧。然后就要看 TimeStats 的 writeToParcel 接口了:
紫色部分,4byte(writeInt),count 总共启动次数,0x0000 0001,1次。然后后面红色的部分是 TimeStats 的那个 int[] times 的数组的数值,全都是 4byte(writeInt),一共10个:正好从 0x00000a8h ~ 0x00000cfh 40byte。然后第2个为1,去翻下前面那个数组的定义:第二时间段正好是 250-500ms的(第一个是 <250ms)。
然后剩下的就是循环重复了的,有兴趣的自己往下读一下了。从我们自己分析文件中的二进制数据发现,是和 USS 中的数据对得上的。
最后再说下前面说到 Parcel.obtain 带缓存效果是怎么回事,我们直接看代码:
1
2
3
4
5
6
7
8
9
10
11
12
13
14
15
16
17
18
19
20
21
22
23
24
25
26
27
28
29
30
31
32
33
34
35
36
37
38
39
40
41
42
43
44
45
46
47
48
49
50
51
52
53
54
55
56
57
58
59
60
61
62
63
64
... ...
private static final int POOL_SIZE = 6 ;
private static final Parcel[] sOwnedPool = new Parcel[POOL_SIZE];
private static final Parcel[] sHolderPool = new Parcel[POOL_SIZE];
... ...
static protected final Parcel obtain (int obj) {
final Parcel[] pool = sHolderPool;
synchronized (pool) {
Parcel p;
for (int i=0 ; i<POOL_SIZE; i++) {
p = pool[i];
if (p != null ) {
pool[i] = null ;
if (DEBUG_RECYCLE) {
p.mStack = new RuntimeException();
}
p.init(obj);
return p;
}
}
}
return new Parcel(obj);
}
... ...
public final void recycle () {
if (DEBUG_RECYCLE) mStack = null ;
freeBuffer();
final Parcel[] pool;
if (mOwnsNativeParcelObject) {
pool = sOwnedPool;
} else {
mNativePtr = 0 ;
pool = sHolderPool;
}
synchronized (pool) {
for (int i=0 ; i<POOL_SIZE; i++) {
if (pool[i] == null ) {
pool[i] = this ;
return ;
}
}
}
}
从这里我们可以看出,在使用 Parcel 的时候,尽量调用 Parcel.obtain 来获取 Parcel 来使用,使用完之后要调用 recycle 把不用的 Parcel 还到缓存池中去,以便下次使用。这样能减少 GC 的概率。对了前面 Parcel 还有2个函数没说(java 中的直接挂 jni 的马甲,直接上 jni 代码):
1
2
3
4
5
6
7
8
9
10
11
12
13
14
15
16
17
18
19
20
21
22
23
24
25
26
27
28
29
30
31
32
33
34
35
36
37
38
39
40
41
42
43
44
45
46
47
48
49
50
51
52
53
54
55
56
57
static jbyteArray android_os_Parcel_marshall(JNIEnv* env, jclass clazz, jint nativePtr)
{
Parcel* parcel = reinterpret_cast <Parcel*>(nativePtr);
if (parcel == NULL) {
return NULL;
}
if (parcel->objectsCount())
{
jniThrowException(env, "java/lang/RuntimeException" , "Tried to marshall a Parcel that contained Binder objects." );
return NULL;
}
jbyteArray ret = env->NewByteArray(parcel->dataSize());
if (ret != NULL)
{
jbyte* array = (jbyte*)env->GetPrimitiveArrayCritical(ret, 0 );
if (array != NULL)
{
memcpy (array , parcel->data(), parcel->dataSize());
env->ReleasePrimitiveArrayCritical(ret, array , 0 );
}
}
return ret;
}
static void android_os_Parcel_unmarshall(JNIEnv* env, jclass clazz, jint nativePtr,
jbyteArray data, jint offset, jint length)
{
Parcel* parcel = reinterpret_cast <Parcel*>(nativePtr);
if (parcel == NULL || length < 0 ) {
return ;
}
jbyte* array = (jbyte*)env->GetPrimitiveArrayCritical(data, 0 );
if (array )
{
parcel->setDataSize(length);
parcel->setDataPosition(0 );
void * raw = parcel->writeInplace(length);
memcpy (raw, (array + offset), length);
env->ReleasePrimitiveArrayCritical(data, array , 0 );
}
}
marshall 是从 Parcel 中获取打包好的直接流数据;unmarshall 正好反过来,把指定的字节流写入到 Parcel 中。
改造
方案
前面说了那么多,大概弄清楚 USS 统计了什么数据,如果保存的。从上面来看,如果要利用 USS 来进行应用时长统计,只要做一点点修改就行了。首先 USS 只会保存最近5天的数据,可以自己在 framework 中写一个 Provider 把 USS 的数据全部存到数据库中。我是在只建了一张表,就2个字段,一个是 long 时间,一个是 blob USS 每一个保存文件的对应的二进制数据(也就是 Parcel 中的内存结构)。这样做出于下面的的考虑:
数据量不会太大,一天一个文件,也就是说一天一条记录,1000 条够3年多了。一般设备上安装的应用也不会特别多,所以对应每一条的 blob 数据也不会太大。
使用数据库方便查询,对于生成一些指定范围时间范围内的数据报表很有帮助,例如说最近一个星期、最近1个月的使用情况。
保存的是 USS 的原始数据,如果需要 USS 增加什么新数据的话,数据库不需要升级表字段。
Provider 接口方便多个进程调用。
因为相当于是把 USS 生成的文件保存到数据库中了,所以解析速度会稍微慢一点,但是对于查看统计应用时长的需要,转个圈圈加载一下下也没啥关系。
但是需要注意一点:从上面的分析知道 USS 保存到文件中的数据并不是当前的实时数据,所以保存在数据库中的也不是实时数据,也就说从 Provider 读到的也不是实时数据。实时数据在 USS 的内存中(mStats),所以如果要判断当前某些应用使用多长时间(应用监控功能),需要在 USS 拉接口,去取 mStats 的数据。
实现
上面把方案说了一下,实现的话这里简单说一下就行了,不贴代码了(这篇已经够长了,而且改造挺简单的)。新加一个 Provider 的话,可以在 packages/providers 下面新建一个 UsageStatsProvider 的模块,Android.mk 和 ContentProvider 的写法,可以照着同目录的几个 providers 抄一下。然后如果要随系统发布的话,记得把你新加的模块加到编译脚本中。然后去 frameworks/base/core/java/android/provider 下面加一个 UsageStats.java 的文件,把数据库的表字段、对外的 Provider URL 定义好(拉接口)。然后数据保存就弄得差不多了。
最后就是要让 USS 保存文件的时候调用下你写的 Provider 的接口,把文件顺带写到数据中。通过上面的分析,就在 writeToFileParcel 成功写入那加就行了,还有现成的 blob 数据(Parcel 的打包数据)。
然后 USS 拉接口的就要具体业务了,这里不多说了。
总结
终于说完了。其实 USS 还有一些东西我没管(例如那个 resume 的历史记录 xml 文件),以后用到再说。还有顺带分析的 AMS 那里也是还有很多种情况没分析到的。还有这里只说了 startActivity,对应的 finishActivity 还没说,以后再说了。还有以后顺带把 Handler、Looper、MessageQueue 也整理一篇。